Discovering that Google has blacklisted your website is every business owner’s nightmare. One moment your site is generating traffic and leads, the next it’s flagged with a terrifying red warning screen that scares away visitors and tanks your search rankings overnight.
If you’re seeing messages like “The site ahead contains malware” or “Deceptive site ahead” when trying to access your website, you’re dealing with a Google Safe Browsing penalty. The good news? Google malware warning removal is possible, and with the right approach, you can get your site back to normal faster than you think.
In this guide, we’ll explain exactly why Google blacklists websites, walk you through the complete removal process step-by-step, and show you how to recover your SEO rankings after cleanup. Let’s get your site back online and your business back on track.
| Blacklisting Reason | Typical Indicators | Immediate Risk |
|---|---|---|
| Malware / Drive-by downloads | Reports of malicious downloads, AV detections, iframe redirects | High — visitors infected |
| Phishing pages | Copy of login pages, credential harvest forms | High — credential theft |
| Hacked site (webshell/backdoor) | Unknown admin users, modified plugin/theme files, obfuscated PHP | High — persistence and data theft |
| Unwanted software / PUP | Bundled installers, deceptive downloads | Medium — reputational & legal risk |
| SEO spam & doorway pages | Thin doorway pages, keyword stuffer pages, spammy redirects | Medium — ranking penalty |
What Does It Mean When Google Blacklists Your Site?
When Google blacklists a website, it means Google Safe Browsing has detected potentially harmful content on your site and is now warning users before they visit. These warnings appear in search results, Chrome browsers, and Firefox browsers, effectively cutting off the majority of your web traffic.
There are several types of Google blacklist warnings:
“The site ahead contains malware” – Google detected malicious software that could harm visitors’ computers or steal their information.
“Deceptive site ahead” – Your site is suspected of phishing, social engineering, or tricking users into sharing personal information.
“The site ahead contains harmful programs” – Google found software that changes browser settings, installs unwanted programs, or behaves deceptively.
“Uncommon download / This file is not commonly downloaded” – A file on your site is flagged as potentially dangerous.
These warnings don’t just scare visitors away. They devastate your business by destroying trust, obliterating conversion rates, and signaling to Google that your site shouldn’t rank well in search results.
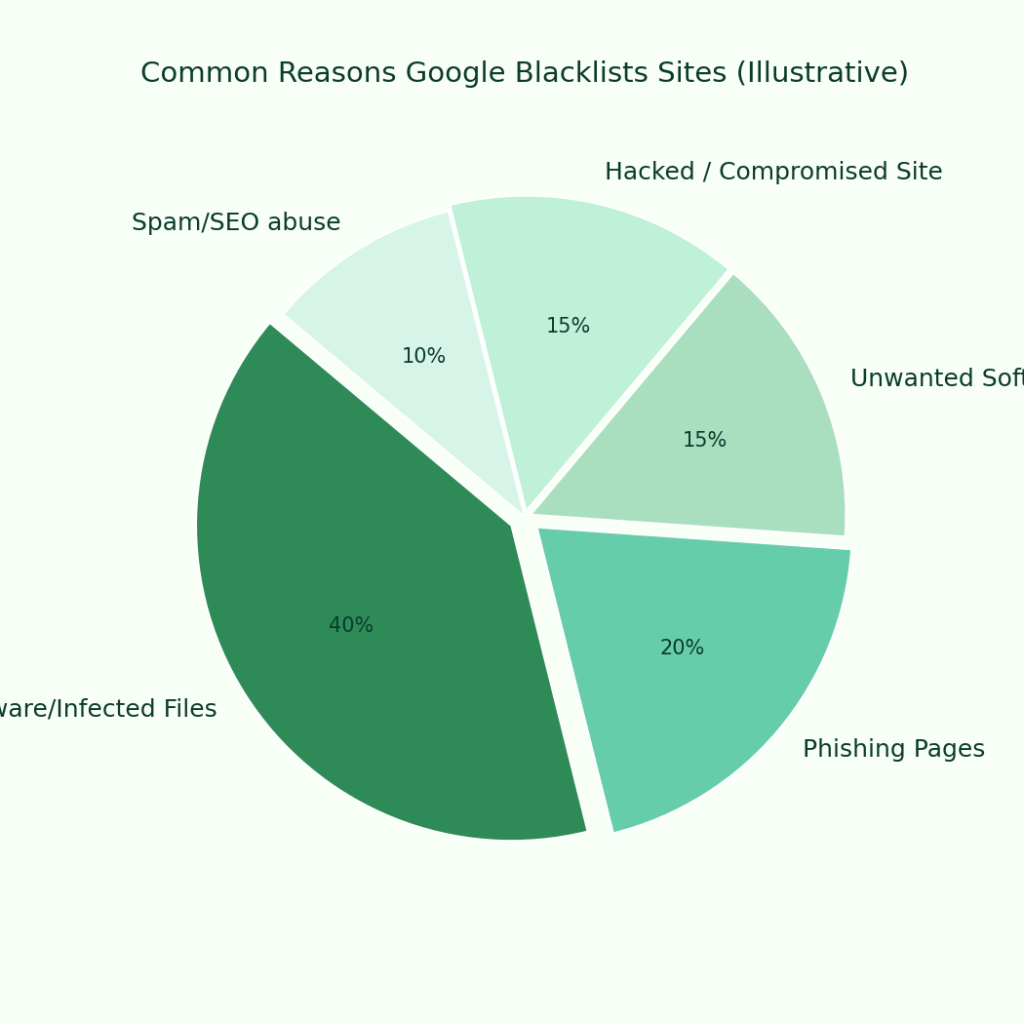
Why Did Google Blacklist Your Website?
Understanding the root cause is essential for both Google malware warning removal and preventing future blacklisting. Here are the most common reasons:
1. Malware Infection
This is the number one reason for Google blacklisting. Hackers inject malicious code into your website files, database, or plugins. This malware might:
- Redirect visitors to malicious sites
- Steal visitor credentials or payment information
- Install viruses or ransomware on visitor devices
- Use your server to send spam or attack other sites
- Display unwanted ads or pop-ups
Malware often hides in theme files, plugins, image uploads, or database entries. It can be virtually invisible to site owners while being obvious to Google’s scanners.
2. Website Compromise or Hack
Your site might have been compromised through:
- Outdated WordPress, plugins, or themes with known vulnerabilities
- Weak administrator passwords that were brute-forced
- Unsecured file upload forms
- SQL injection attacks
- Cross-site scripting (XSS) vulnerabilities
- Compromised FTP or hosting account credentials
Once hackers gain access, they often inject hidden malware, create backdoors for future access, and may blacklist your site within hours.
3. Phishing Content
Google blacklists sites that attempt to trick users into revealing sensitive information by impersonating legitimate services. This includes:
- Fake login pages mimicking banks, PayPal, or other services
- Forms designed to steal credit card information
- Pages impersonating government agencies or well-known brands
- Social engineering tactics to extract personal data
Sometimes legitimate sites are compromised and have phishing pages added without the owner’s knowledge.
4. Malicious Redirects
If your site redirects visitors to dangerous external websites, Google will blacklist it. Redirects might send users to:
- Pharmaceutical spam sites
- Adult content websites
- Malware distribution networks
- Fake antivirus scam pages
These redirects are often conditional, triggering only for visitors from search engines or specific geographic locations, making them hard for site owners to detect.
5. Compromised Third-Party Scripts or Ads
Sometimes the problem isn’t your core website but rather:
- Ad networks serving malicious advertisements
- Compromised analytics scripts
- Infected third-party widgets or plugins
- Hacked CDN resources
Even though you didn’t directly add the malicious content, Google holds you responsible for everything served from your domain.
6. SEO Spam Injection
Hackers inject spam content to boost rankings for unrelated products or services, such as:
- Hidden pharmaceutical links
- Gambling or adult content links
- Keyword-stuffed hidden text
- Doorway pages for black hat SEO
This spam might be invisible to regular visitors but clearly visible to search engines.
How to Check If Your Site Is Blacklisted
Before starting the Google Safe Browsing removal process, confirm that your site is actually blacklisted:
Check Google Safe Browsing Status: Visit: https://transparencyreport.google.com/safe-browsing/search?url=yoursite.com
Replace “yoursite.com” with your actual domain. This shows your current Safe Browsing status and any detected issues.
Check Google Search Console: Log into Google Search Console and look for Security Issues warnings. This provides detailed information about detected threats and affected pages.
Manual Browser Test: Try accessing your site in Chrome or Firefox. If blacklisted, you’ll see the warning screen before reaching your site.
Check Multiple Blacklist Databases: Your site might also be blacklisted by other services beyond Google, including Norton Safe Web, McAfee SiteAdvisor, or Yandex.
| Task | Why | Done? |
|---|---|---|
| Take forensic backup | Preserve evidence | [ ] |
| Scan site with 2+ scanners | Corroborate Google findings | [ ] |
| Remove malicious files & DB entries | Eliminate payloads | [ ] |
| Patch CMS, plugins & themes | Close exploited vectors | [ ] |
| Rotate passwords & revoke keys | Block attacker access | [ ] |
| Apply WAF & monitoring | Prevent reinfection | [ ] |
| Submit Google review | Request delisting | [ ] |
Step-by-Step Google Malware Warning Removal Process
Now let’s walk through exactly how to remove the blacklist from Google and get your site back online safely.
Step 1: Take Your Site Offline (If Actively Spreading Malware)
If your site is actively distributing malware or stealing visitor information, take it offline immediately by:
- Enabling maintenance mode through your CMS
- Using your hosting control panel to suspend the site
- Creating a temporary landing page explaining the situation
This protects your visitors and your reputation while you clean the site.
Step 2: Backup Your Site (Even If Infected)
Before making any changes, create a complete backup including:
- All website files
- Database
- Email accounts
- Any other hosting account data
This provides a restore point if something goes wrong during cleanup, even though the backup contains malware.
Step 3: Scan for Malware
Use multiple scanning methods to identify infected files:
Server-Level Scanning: Ask your hosting provider to run malware scans, as they often have tools that can detect infections missed by plugins.
Manual File Comparison: Compare your current files against clean versions from official sources. Look for files with recent modification dates you don’t recognize.
Database Scanning: Search your database for suspicious JavaScript, iframes, or base64 encoded strings that might indicate injection attacks.
Step 4: Identify All Infected Files and Code
Document every infected file and database entry you find. Common hiding spots include:
.htaccessfiles (hidden by default)index.phpand other core CMS files- Theme
header.phpandfooter.phpfiles - Plugin files, especially in lesser-known plugins
- Database entries in posts, comments, and options tables
- Image files that actually contain code
- Hidden files or directories
Step 5: Remove All Malware
Clean your site thoroughly:
For File Infections:
- Delete infected files that aren’t part of your core CMS
- Replace infected core files with clean versions from official sources
- Clean malicious code from legitimate files by manually editing them
- Remove any unfamiliar files, directories, or backdoors
For Database Infections:
- Use search and replace tools to find and remove malicious code
- Clean infected posts, pages, and comments
- Review and clean the options table
- Check user accounts for suspicious administrator accounts
For WordPress Sites:
- Delete and reinstall WordPress core files (preserving wp-content)
- Delete all plugins and reinstall from official sources
- Delete and reinstall your theme or restore a clean backup
- Review all users and remove suspicious accounts
Step 6: Update Everything
Outdated software is how most sites get compromised in the first place:
- Update your CMS to the latest version
- Update all plugins and extensions
- Update your theme
- Update PHP to a supported version
- Update any other server software
Step 7: Harden Your Security
Prevent reinfection by implementing security measures:
- Change all passwords (admin, FTP, hosting, database)
- Install a web application firewall (WAF)
- Implement two-factor authentication for admin accounts
- Restrict file permissions appropriately
- Disable file editing from the CMS dashboard
- Remove unused plugins and themes
- Set up regular automated backups
- Enable security monitoring and alerts
- Use security headers
Step 8: Request a Review from Google
Once your site is completely clean and secured, request Google Safe Browsing removal:
Through Google Search Console:
- Log into Google Search Console
- Go to Security & Manual Actions → Security Issues
- Click “Request Review”
- Provide a detailed explanation of what you found and how you fixed it
Sample Review Request Text:
Subject: Request for Google Safe Browsing Removal – [YourDomain.com]
Dear Google Security Team,
I am requesting a review of [YourDomain.com] for removal from Google Safe Browsing blacklist.
Issue Identified: On [Date], I discovered that my website was compromised and infected with malware. Google Safe Browsing correctly identified malicious code on [specific pages/throughout the site].
Actions Taken:
- Took the site offline to protect visitors
- Performed comprehensive malware scanning using [tools used]
- Identified malware in [specific locations: theme files, plugins, database]
- Removed all malicious code and infected files
- Restored clean versions of compromised files
- Updated all software (CMS, plugins, themes) to latest versions
- Changed all passwords and credentials
- Implemented security hardening measures including:
- Web Application Firewall
- Two-factor authentication
- File permission restrictions
- Security monitoring
- Regular backup schedule
- Conducted final verification scan showing no remaining malware
Current Status: The website is now completely clean and secured against future attacks. All vulnerabilities that allowed the initial compromise have been addressed.
Verification: Please re-scan the site to confirm all malicious content has been removed. I have reviewed all pages mentioned in the security warning and verified they are clean.
I appreciate your prompt review of this request.
Thank you, [Your Name] [Contact Information]
Step 9: Monitor During Review Process
While waiting for Google’s review:
- Continue monitoring your site for any signs of reinfection
- Check Google Safe Browsing status daily
- Watch for any new security alerts
- Maintain your security measures
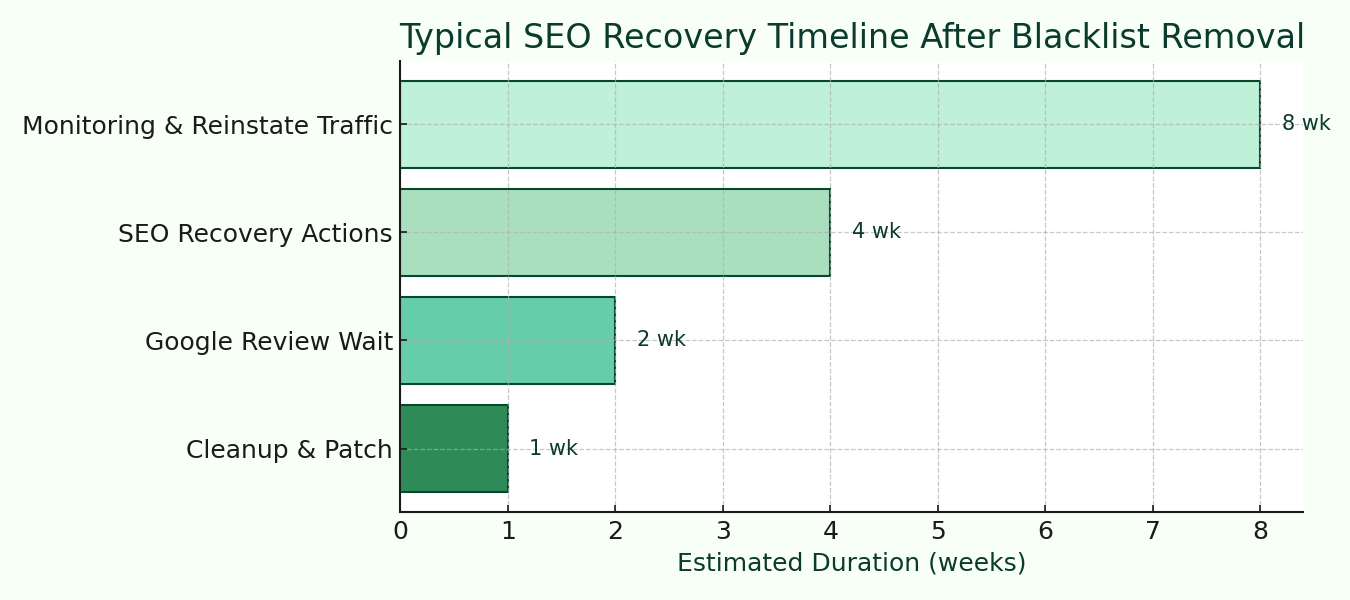
Google typically reviews requests within a few days but can take up to 72 hours or longer depending on the severity and complexity of the infection.
How Long Does Google Malware Warning Removal Take?
The timeline for complete removal varies:
- Cleanup: 2-24 hours depending on infection severity and site size
- Google Review: 24-72 hours after submitting your request
- Cache Clearing: Additional 24-48 hours for all warnings to disappear across all browsers and platforms
- Full Recovery: 1-4 weeks for complete SEO and traffic recovery
Some blacklist removals happen within hours, while complex cases can take several days. The key is thorough cleanup and a complete review request.
SEO Recovery After Google Blacklist Removal
Getting removed from the blacklist is just the first step. Here’s how to recover your SEO rankings:
Immediate Post-Removal Actions
Submit Your Site for Re-Indexing: Use Google Search Console’s URL Inspection tool to request re-indexing of your cleaned pages.
Update Your Sitemap: Submit an updated XML sitemap to help Google recrawl your site efficiently.
Monitor Search Console: Watch for any new security warnings or indexing issues that might indicate reinfection or residual problems.
Rebuilding Trust and Rankings
Create Fresh, High-Quality Content: Publishing new content signals that your site is active, legitimate, and providing value.
Rebuild Backlinks: Reach out to sites that removed links during your blacklist period. Explain the situation was resolved and request link restoration.
Update Social Media: Announce that your site is clean and safe, rebuilding trust with your audience.
Monitor Your Reputation: Search for mentions of your site being hacked and correct any lingering misinformation.
Increase Crawl Frequency: Regular updates encourage Google to crawl your site more frequently, speeding recovery.
Long-Term SEO Recovery Strategy
Track Your Rankings: Monitor keyword positions weekly to measure recovery progress.
Analyze Traffic Patterns: Use Google Analytics to identify which pages and traffic sources are recovering fastest.
Focus on User Experience: Improve site speed, navigation, and content quality to encourage visitors to return and stay longer.
Build Authority: Earn new backlinks, mentions, and social signals to rebuild domain authority.
Stay Secure: Maintain your security measures because another blacklisting could permanently damage your domain’s reputation.
Most sites see significant traffic recovery within 2-4 weeks, with full ranking restoration taking 1-3 months depending on the blacklist’s duration and severity.
Preventing Future Google Blacklisting
The best approach to Google malware warning removal is prevention:
Implement Ongoing Security Measures:
- Keep all software updated automatically
- Use strong, unique passwords with a password manager
- Enable two-factor authentication everywhere possible
- Install and configure a web application firewall
- Use security monitoring services that alert you immediately to threats
- Perform regular security audits and vulnerability scans
Regular Maintenance Schedule:
- Daily automated backups stored off-site
- Weekly security scans
- Monthly software updates
- Quarterly security audits
- Annual penetration testing
Employee Training:
- Educate staff about phishing and social engineering
- Implement principle of least privilege for user accounts
- Create clear security policies and procedures
Professional Security Services: Consider partnering with security professionals who can:
- Monitor your site 24/7
- Respond immediately to threats
- Conduct regular security assessments
- Provide incident response when needed
- Keep you compliant with security standards
What If You Can’t Clean It Yourself?
Google malware warning removal can be complex, especially for larger sites or sophisticated infections. If you’re struggling with cleanup, consider these options:
Professional Malware Removal Services: Security companies specialize in removing malware and can often clean sites faster and more thoroughly than DIY attempts.
Your Hosting Provider: Many hosts offer malware removal services, sometimes for free to their customers.
Hire a Developer: Experienced developers can identify and remove infections, especially in custom-coded sites.
Start Fresh: In severe cases where cleanup seems impossible, restoring from a clean backup or rebuilding the site might be faster and more effective.
The Bottom Line: Act Fast, Clean Thoroughly
Google blacklisting is serious, but it’s not permanent. With quick action, thorough cleanup, and proper security measures, you can achieve Google Safe Browsing removal and get your business back on track.
The keys to successful removal are:
- Act immediately – Every hour of blacklisting costs you traffic and revenue
- Clean completely – Partial cleanup leads to reinfection and repeat blacklisting
- Secure properly – Prevention is easier and cheaper than repeated cleanup
- Request review correctly – A detailed, accurate review request speeds approval
- Monitor continuously – Catch reinfection early before Google does
Remember, Google’s goal isn’t to punish your site, it’s to protect users. Show them you’ve taken the threat seriously, cleaned thoroughly, and implemented measures to prevent future infections, and they’ll remove the blacklist from Google promptly.
Don’t let a Google blacklist destroy your online presence. Take action now to protect your business, your reputation, and your revenue.
Need Help Removing Your Google Blacklist?
Don’t let a Google malware warning destroy your business another day. Our security experts specialize in fast, complete Google Safe Browsing removal with same-day service available.
Get started now with our free blacklist check:
- Instant analysis of your blacklist status
- Identification of security issues
- No-obligation removal quote
- Same-day cleanup available
We’ve successfully removed thousands of sites from Google’s blacklist. Let us get your site back online and your business back to normal.